
Article by Leo Barros
Before You Begin
- Ensure that you have access to the instance of Oracle Digital Assistant version 23.04 or later.
- The webhook code was developed in node.js and is just a template/example so you can integrate ODA to WhatsApp using rich elements such as buttons, lists of options, location, and others. Any changes or updates to this code are your responsibility. It is also interesting to say that with small changes to this code, you will be able to store information that may be important for your business, such as: if the user received the sent message, if the user read the sent message and other things. This can be interesting, for example, for use cases of marketing campaigns via Oracle Digital Assistant.
- Download and extract the resources.zip file provided with this article (at the bottom) to your local machine, it has the sample skill (whatsapp.zip) & webhook proxy application (webhook_whatsApp_code.zip).
- Import the example skill into your Oracle Digital Assistant instance.
- To test this code, we use NGROK. Of course, if you want to put this code into production it is possible. For this, you just need to expose this code via HTTPS protocol on your application server. You can download this and get more information here. You need to test a localhost tunnel to port 3000 before going any further in this document.
Introduction
Oracle Digital Assistant is an AI-powered platform for building chatbots across various channels, including messaging platforms like WhatsApp. One of the most effective ways to integrate your digital assistant with external systems, such as the WhatsApp channel, is using webhooks.
WhatsApp is the most widely used messaging platform with 2 billion active users around the world, 100 billion messages sent on an everyday basis, and 1 billion users added freshly over the last 4. WhatsApp is a space to build profound relationships with customers to achieve a higher conversion rate, boost sales, and automatically lower marketing costs.
A webhook is a programming interfaces implemented by a system on the web for other programs subscribe and to receive automated notification in case anything of interest happens. One such system is chatbot. Users “register” for a chatbot through a messenger client and by sending messages to the bot. The bot then resolves the request, processes it, and returns a response that the original sender receives. Webhook clients are like adapters that dispatch and manage conversation between a user and a remote system.
In this guide, we will walk you through the process of creating a webhook channel in Oracle Digital Assistant and building a webhook code in Node.js to integrate the WhatsApp API with your chatbot. It is interesting to say that using this code template, you will be able to interact via rich elements with your user, such as buttons, agent integration, image, video, audio, and list of options.
About the WhatsApp Business API
When it comes to messaging channels, the architecture of the WhatsApp Business API solution stands out due to its unique characteristics. Unlike other messaging channels, in order to ensure the secure transmission of messages, it is necessary to maintain a service called the WhatsApp Business API Client or container, which remains continuously connected to the WhatsApp network.
In simple terms, the container or WhatsApp Business API Client behaves like a WhatsApp application, allowing for the encryption and decryption of messages, as well as the storage of company number settings and received media files. It is important to note that each official WhatsApp number requires its own container or API. In this guide, we are using the WhatsApp Business API Client through a webhook configuration.
To fully utilize this messaging channel, it is essential to have a clear understanding of the associated concepts. With this knowledge, businesses can take full advantage of the secure and efficient communication offered by the WhatsApp Business API solution. For our context, it is important that you know the types of messages allowed via the WhatsApp channel, but it is also interesting to obtain information on other subjects such as: WABA – WhatsApp Business Account, Opt-In concepts, number quality, etc. You can get this information from https://www.facebook.com/business/help/325994829075700.
Message types
The WhatsApp Business API offers two types of messages: response messages and notifications (also known as active messages or Message Templates).
Both response messages and notifications are exchanged between companies and their customers, with the main difference being the time interval between the last interaction made by the user with the bot (company).
A response message is any content sent from the bot to the client within 24 hours of the last message sent by the client. All response messages are free of charge. The 24-hour count starts from the last message sent from the customer to the company. Within this period, all messages sent from the company to the customer are considered response messages.
Notifications, on the other hand, are text messages (markdown supported) sent from the company to users (customers) in intervals longer than 24 hours since the user’s last interaction. All notifications are charged and must go through a manual validation process carried out by WhatsApp to ensure that no promotional messages or SPAM are sent to customers. Having a clear understanding of the two types of messages offered by the WhatsApp Business API is crucial for companies looking to leverage this messaging channel to communicate with their customers in a secure and effective manner.
This connector has been configured for response messages, we mean this guide and the shared code refers to messages where the user initiates a conversation.
You can read get more information here.
About the WhatsApp Business Pricing
The WhatsApp Business Platform was developed for companies that want to communicate with a large number of customers, accelerate sales and generate better service results. To learn more and purchase your number, visit: https://business.whatsapp.com/products/platform-pricing.
About the WhatsApp Interactive Messages
Interactive messages give your users a simpler way to find and select what they want from your business on WhatsApp.
You can read get more information here: https://developers.facebook.com/docs/whatsapp/guides/interactive-messages/
Step by step for integrating Oracle Digital Assistant with WhatsApp Channel
In this section, we will provide a step-by-step guide on how to allow human users to interact with the bot via the WhatsApp channel. The guide will cover everything from creating a webhook channel in Oracle Digital Assistant to deploying the Node.js code, which will enable testing of the chatbot. It’s important to say that this webhook code is just a template containing the necessary methods to transform messages from one side to the other. It is your responsibility to change it according to your business need. As described in Figure 1, this integration uses ODA webhook channel to pass user messages to the node.js webhook implementation, webhook implementation calls out your custom WhatsApp channel implementation file that is basically responsible for message transformations between ODA and WhatsApp Cloud API, and then message sent to ODA.

Figure 1 – Webhook Architecture
By following these steps, you will be able to set up a WhatsApp channel for your Oracle Digital Assistant bot, and your users will be able to communicate with the bot through this popular messaging app.
Step 1: Import the sample skill in Oracle Digital Assistant
The first step is to import the sample skill in Oracle Digital Assistant. This is a standard skill; however, it contains examples of various components that were tested using the webhook code. These components are: CommonResponse – with text only, with 2 action options, with 3 action options, with 4 action options, with 11 action options, AgentInitiation/AgentConversation, Attachment, etc. It is important to say that when you want to send a location to the end user, you will have to add metadata to the response items. This metadata is channelCustomProperties and must be included like this:

Figure 2 – Location message type payload
You will have access to the information that WhatsApp renders as list options with a maximum of 10 options. More than 10 options will be reindered as text options, so it is recommended that you create the response items with the label containing the numbering (or you can also use the autoNumberPostbackActions property as true), as shown in this example:

Figure 3 – More 10 actions options example
Finally, it is important to say that WhatsApp does not allow the use of messages with multiple types of actions, for example, postback and url in the same component. Therefore, be aware of this detail when developing your dialog flow.
Step 2: Set Up a Webhook Channel in Oracle Digital Assistant
Now, you need to set up a webhook channel in Oracle Digital Assistant. This will enable your chatbot to receive and respond to incoming messages from external systems, such as WhatsApp. Here’s how you can do it:
- Log in to the Oracle Digital Assistant console and open your bot.
- Go to the Channels section and click on the “+” icon to create a new channel.
- Select “Webhook” as the channel type.
- Enter a name for your webhook channel.
- Generate a secret key and copy it to your clipboard. You will need this later to authenticate requests to your webhook endpoint.
- In the Webhook URL field, enter the URL of your webhook endpoint. This is the URL where your webhook code will listen for incoming messages from WhatsApp. You can use a tool like NGROK to create a public URL for your local development environment.
- Configure the message routing settings for your webhook channel. You can select the intents and entities that your chatbot should handle.
- Click on the “Save” button to create your webhook channel.
- Select the testing skill provided along with this document in “Route To” field and enable the webhook channel created.

Figure 4 – Webhook channel configuration
Step 2: Create an application in Meta to use the WhatsApp API
In this step, we will show you how to create a Facebook Developers application and use WhatsApp API in Node.js code later. In this guide, we are configuring a sandbox WhatsApp application. Do the following:
- Go to the Facebook Developers website (https://developers.facebook.com/) and log in with your Facebook account.
- Click on the “Get Started” button and select “Create App”.

Figure 5 – Create an app
- Choose “Business” as the app type and then click “Next”.
- Choose a name for your application, inform the contact email and if the sandbox configuration is already ready, select the business account (this is an optional step. If you do not have this account set up, use the step 7 – “Create a business account” below) and then click on “Create app” as shown in the image below.

Figure 6 – App details
- Click “Set Up” under “WhatsApp”.

Figure 7 – Add product
- In the “WhatsApp Business Account” section, click “Add”.
- If you don’t have a Business Account already set up, click on “Create a Business Account” and the “Getting Started” screen will appear. In this screen, you need to get the Temporary Access Token information. You will need this token to configure the webhook code later, so please store it in a temporary file. This temporary access token it is valid for 24 hours, so in testing, you may have to update this information in your code.

Figure 8 – Getting started
- Add a recipient (To) phone number as above and verify it with the code which WhatsApp will send on the number.
- Click on “Send Message”, for testing and getting the messages on the “Phone Number” mentioned in the sandbox page. Test the flow with the API which is given and see how messages are flowing from test number to the recipient number.

Figure 9 – Hello world message
You can also test the APIs via Postman. In this step it is important that you store two pieces of information in your temporary file. You will need them later in the code setup. This information is: the API version (in the image below, you can see that I am using v16.0 and the phone ID. This information can be obtained from the same URL, right after the API version.

Figure 10 – Get API Version and Phone ID information
- Scroll down until “Step 3: Configure webhooks to receive messages” and click on Configure webhooks.

Figure 11 – Configure Webhooks
- Click “Edit” and set your Callback URL with “https://” + your URL + “/user/message” and enter a verification token of your choice. You will use this token later in your code as well, so store this information in your temp file.

Figure 12 – Callback URL Configuration
- On Webhook fields area click on “Manage” and click on “subscribe” for business_capability_update, messages, phone_number_name_update and security options, as below. Save the “Subscription Version” as you will need it to configure your webhook code later.

Figure 13 – Webhook fields
- Click on “subscribe” for business_capability_update, messages, phone_number_name_update and security options, as below. Save the “Subscription Version” as you will need it to configure your webhook code later.
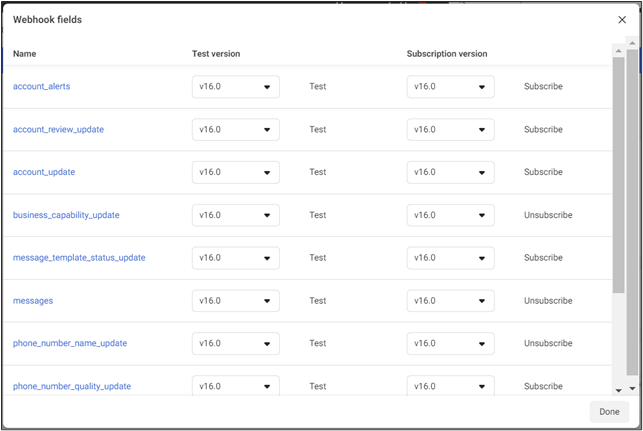
Figure 14 – Set the webhook fields
Step 3: Execute a Node.js Webhook Sample Code for WhatsApp
Now that you have set up a webhook channel in Oracle Digital Assistant, you can create a webhook code in Node.js to handle incoming messages from WhatsApp. Here’s how you can do it:
- Extract the webhook_whatsApp_code.zip file provided. In this code, we create an Express app and configured it to parse incoming JSON data using Body Parser.
Extract the provided whatsapp.zip file. In this code, we create an Express application and configure it to parse incoming JSON data using Body Parser. This code contains methods for receiving various types of messages from both Oracle Digital Assistant and WhatsApp.
Here are some examples of payloads that are sent to Oracle Digital Assistant with the appropriate types. It is important to respect the boundaries in your dialog flow in ODA:
- Text
{
“type”: “text”,
“text”: “hello, world!”
}
- Postback
{
“type”: “postback”,
“postback”: {
“action”: “deliverPizza”
}
}
- Attachment
{
“type”: “attachment”,
“attachment”: {
“type”: “image”,
“url”: “https://image.freepik.com/free-icon/attachment-tool-ios-7-interface-symbol_318-35539.jpg”
}
}
- Location
{
“type”: “location”,
“location”: {
“longitude”: -122.265987,
“latitude”: 37.529818
}
}
Here are some examples of payloads that are sent to WhatsApp with the appropriate types and limitations:
Text
- Body text is limited to 4096 characters.
{
“type”: “text”,
“text”: {
“body”: “Simple text message”
}
}
Rich Link
- Body text is limited to 4096 characters.
- http:// or https:// links are accepted – https:// URLs are preferred.
- Search Engine Optimized content will have rich meta-information to be shown.
- On-click opens in a new tab.
{
“type”: “text”,
“text”: {
“body”: “https://yourURL”,
“preview_url”: “true”
}
}
Quick Replies (Buttons)
- Button “title” is limited to 20 characters.
- Button “id” is limited to 256 characters.
- Body text is limited to 1024 characters.
- Min. 1 and max. 3 “reply” buttons can be added.
- Reply “id” and “title” both must be non-empty and unique.
- If the header is of type “text”, the text is limited to 60 characters.
- If the header is of type image/video/audio it does not accept caption. Important to also change the “type” value accordingly.
{
“type”: “interactive”,
“interactive”: {
“type”: “button”,
“body”: {
“text”: “This is my Text”
},
“action”: {
“buttons”: [
{
“type”: “reply”,
“reply”: {
“id”: “123”,
“title”: “Button1”
}
},
{
“type”: “reply”,
“reply”: {
“id”: “1234”,
“title”: “Button2”
}
}
]
}
}
}
Image
- Image file extensions supported – .png, .jpg.
- Downloadable link or freely accessible content.
{
“type”: “image”,
“image”: {
“link”: “https://imageURL”,
“caption”: “Image caption”
}
}
Video
- Video file extensions supported: .mp4
- Downloadable link or freely accessible content (e.g. Youtube links are unsupported).
- For unsupported links use “Rich Link” output type above.
{
“type”: “video”,
“video”: {
“link”: “https://videoURL”,
“caption”: “Video caption”
}
}
Audio
- Audio file extensions supported: .mp3
- Does not support the caption field.
- Downloadable link or freely accessible content.
- For unsupported links use “Rich Link” output type above.
{
“type”: “audio”,
“audio”: {
“link”: “https://audioURL”
}
}
Document
- Note that the linked document gets downloaded when clicked.
{
“type”: “document”,
“document”: {
“link”: “http://documentURL”,
“filename”: “Name of the file”
}
}
Location
- Latitude of the location in number (Min: -90 and Max: 90).
- Longitude of the location in number (Min: -180 and Max: 180).
{
“type”: “location”,
“location”: {
“latitude”: 51.214005624409445,
“longitude”: 6.748941454406442,
“name”: “Oracle HQ”,
“address”: “Speditionstraße 1, Düsseldorf, North Rhine-Westphalia 40221”
}
}
List
- “sections” field is required for List Messages. An array of section objects can be min. of 1 and max. of 10.
- “sections.title” value is limited to 24 characters.
- “rows” field is required for List Messages. An array of rows objects can be min. of 1 and max. of 10.
- “id” in a row object value is limited to 24 characters.
- “title” in a row object value is limited to 200 characters.
- “description” in a row object value is limited to 72 characters.
- Body text is limited to 1024 characters.
- “button” value is limited to 20 characters.
- Row object “id” and “title” both must not be empty and unique.
- The header can only be of type “text” and text is limited to 60 characters.
- Footer “text” value is limited to 60 characters.
{
“type”: “interactive”,
“interactive”: {
“type”: “list”,
“header”: {
“type”: “text”,
“text”: “This is the name of the list”
},
“footer”: {
“text”: “Subtext of the list”
},
“body”: {
“text”: “This is text*”
},
“action”: {
“button”: “Send”,
“sections”: [
{
“title”: “<List Category Item>”,
“rows”: [
{
“id”: “<Item ID>1”,
“title”: “<Item Title>”,
“description”: “<Item Description>”
},
{
“id”: “<Item ID>2”,
“title”: “<Item Title>”,
“description”: “<Item Description>”
},
{
“id”: “<Item ID>3”,
“title”: “<Item Title>”,
“description”: “<Item Description>”
}
]
}
]
}
}
}
- Set the variables in Config.js file. In this file, you need to set the below variables:
- ODA_WEBHOOK_URL and ODA_WEBHOOK_SECRET are variables coming from Oracle Digital Assistant. You got them in step 1 from this document.
- port, FILES_URL, and LIST_TITLE_DEFAULT_LABEL are variables for general use. The first refers to the port of the application, the second to the URL where the download files will be and the last is the label (default is select one) that will appear in the list type component for the user to click on, as in the example in the image below:

- VERIFY_TOKEN, ACCESS_TOKEN, API_VERSION, and PHONE_NUMBER_ID are settings coming from WhatsApp. You got them in step 2 from this document.
- In the command line terminal, install the libraries with npm install command.
- In the command line terminal, execute the code with node server.js (in the /src folder) command.
- Test your application by sending a desired message from your WhatsApp test number. Here, some screenshot of this solution in action:

Figure 15 – Output and Question components

Figure 16 – List options

Figure 17 – Components with header and footer text

Figure 18 – Location

Figure 19 – More than 10 actions
RESOURCES
To download the code artifacts – check here at the bottom of the page.